Are you looking for an easy-to-follow WooCommerce Plugin tutorial for non-techies? If so, you’ve come to the right place.
There are many benefits to using WooCommerce, including its flexibility, cost-effectiveness, and ease of use even for beginners.
It is however common for beginners to feel a bit intimidated by the idea of setting up WooCommerce themselves. Most users struggle with learning how to get started with WooCommerce and how to set it up properly.
You will be guided step-by-step through setting up WooCommerce Plugin in this ultimate WooCommerce tutorial. We will also provide you with resources, such as the best WooCommerce themes and WooCommerce SEO tips.
– Table of Contents
Are you ready to build your store? Let’s get started.
The WooCommerce platform is a free eCommerce software that allows people to sell products and services online. Over the past few years, it has become one of the most popular eCommerce platforms in the world.
A WordPress extension for eCommerce, WooCommerce, allows users to build eCommerce websites from scratch or to add shopping cart functionality to existing WordPress websites.
The WooCommerce Plugin is free to use and download. However, you will still need a domain name and web hosting service to create a website, which are not free. We will discuss WooCommerce Plugin pricing later in the article.
WooCommerce Plugin has become the most popular eCommerce software in the world because of its ease of use for beginners and powerful features.
With WooCommerce Plugin, you can have complete control over your eCommerce website and access it 100% for free.
Contrary to proprietary eCommerce platforms, WooCommerce Plugin allows you to create unlimited online stores.
We have a complete review of WordPress that explains all the benefits of using the WooCommerce plugin.
It’s easy to start a store with WooCommerce Plugin because many of the designs are free and easy to customize.
There are many reasons why business owners love WooCommerce Plugin, including its flexibility. It is possible to extend WooCommerce’s functionality using thousands of plugins, including bookings, subscriptions, shipping platform integration, and sales tax
collection. By adding plugins (also known as add-ons), you can enhance WooCommerce’s functionality.
You can also use thousands of WordPress plugins to add features to your website such as contact forms, call now buttons, galleries, data backup, and security firewalls, in addition to WooCommerce addons.
Using WooCommerce Plugin also has the advantage of not limiting your business operations in any way.
The number of products you can add is unlimited. The number of sales you can make is unlimited. The number of images, videos, and categories you can add is unlimited.
WooCommerce integrates seamlessly with dozens of payment services and gateways, which is a major advantage for those who wish to accept payments online.
It supports PayPal and Stripe by default, and you can add-on dozens of additional payment gateways. Integrations are even available for lesser-known and regional payment gateways.
Compare WooCommerce Plugin with other popular eCommerce platforms in the following comparisons.
- WooCommerce vs Shopify
- WooCommerce vs BigCommerce
- WooCommerce vs Magento
Now let’s see what you’ll need to make an online store with WooCommerce.
To build a WooCommerce website from scratch, you will need the following three items.
- A WordPress hosting account. This is where all your website files will be stored.
- A domain name. This is your website’s address on the internet e.g. wpbeginner.com
- A SSL Certificate to securely accept online payments
There are a number of items above that don’t come free and cost money. Beginners often ask why these items are so expensive, as WooCommerce Plugin is free.
To build any type of website (not just WooCommerce), you have to pay for these three things.
If you only purchase the services you really need for your website, you can easily control the overall cost of your online store (WooCommerce pricing).
When your business starts making money, you can add other things.
The cost of web hosting for a starter site is usually $7.99 / month, domain names are $14.99 / year, and SSL certificates are around $69.99 / year.
The investment is significant, and when you are starting a new business, every penny counts.
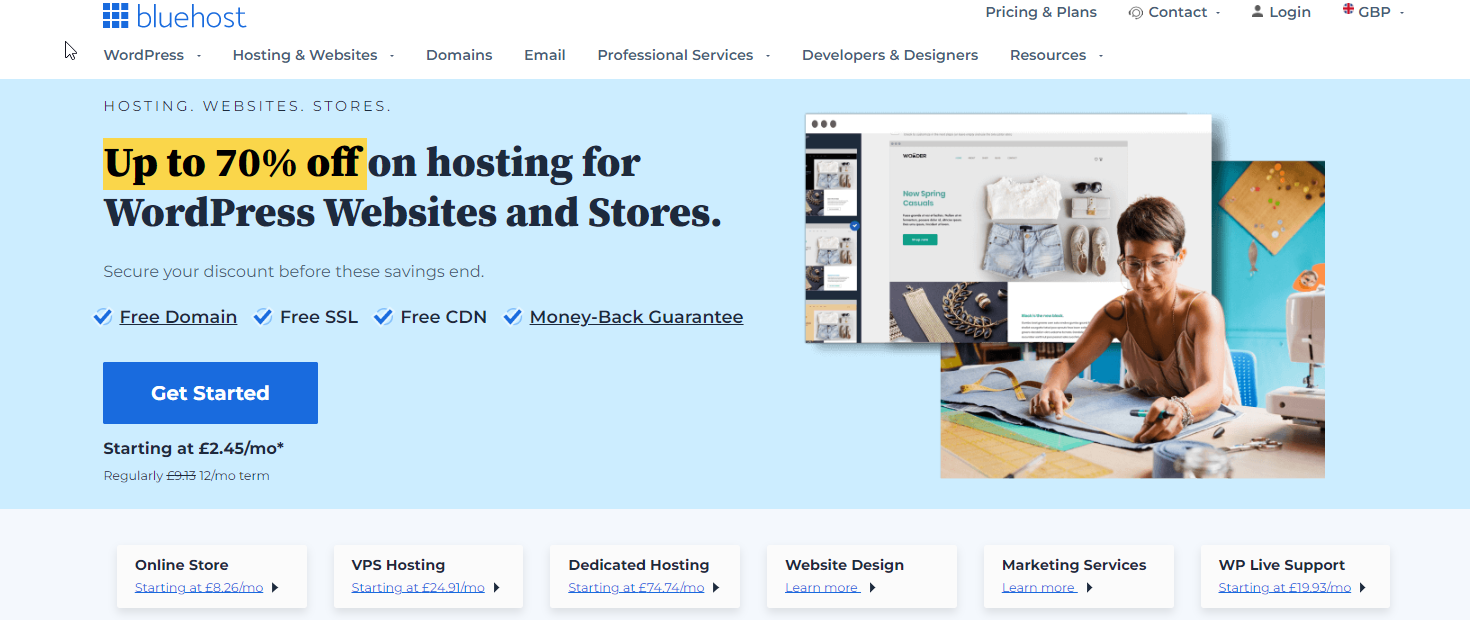
WPBeginner readers are eligible for an exclusive discount of $2.75 per month on web hosting with a free domain name and SSL from Bluehost, an official WooCommerce Plugin and WordPress hosting provider.
There are millions of websites on the internet, including many of our own, hosted by Bluehost.
Let’s move on to the step-by-step instructions for setting up WooCommerce Plugin now that we’ve covered the basic requirements.
First, you need to visit the Bluehost website and click on the ‘Get Started Now’ button.
 Select a plan and continue.
Choosing a hosting plan is the next step. Basic and Plus plans are popular among users, and you can always upgrade when you need more resources.
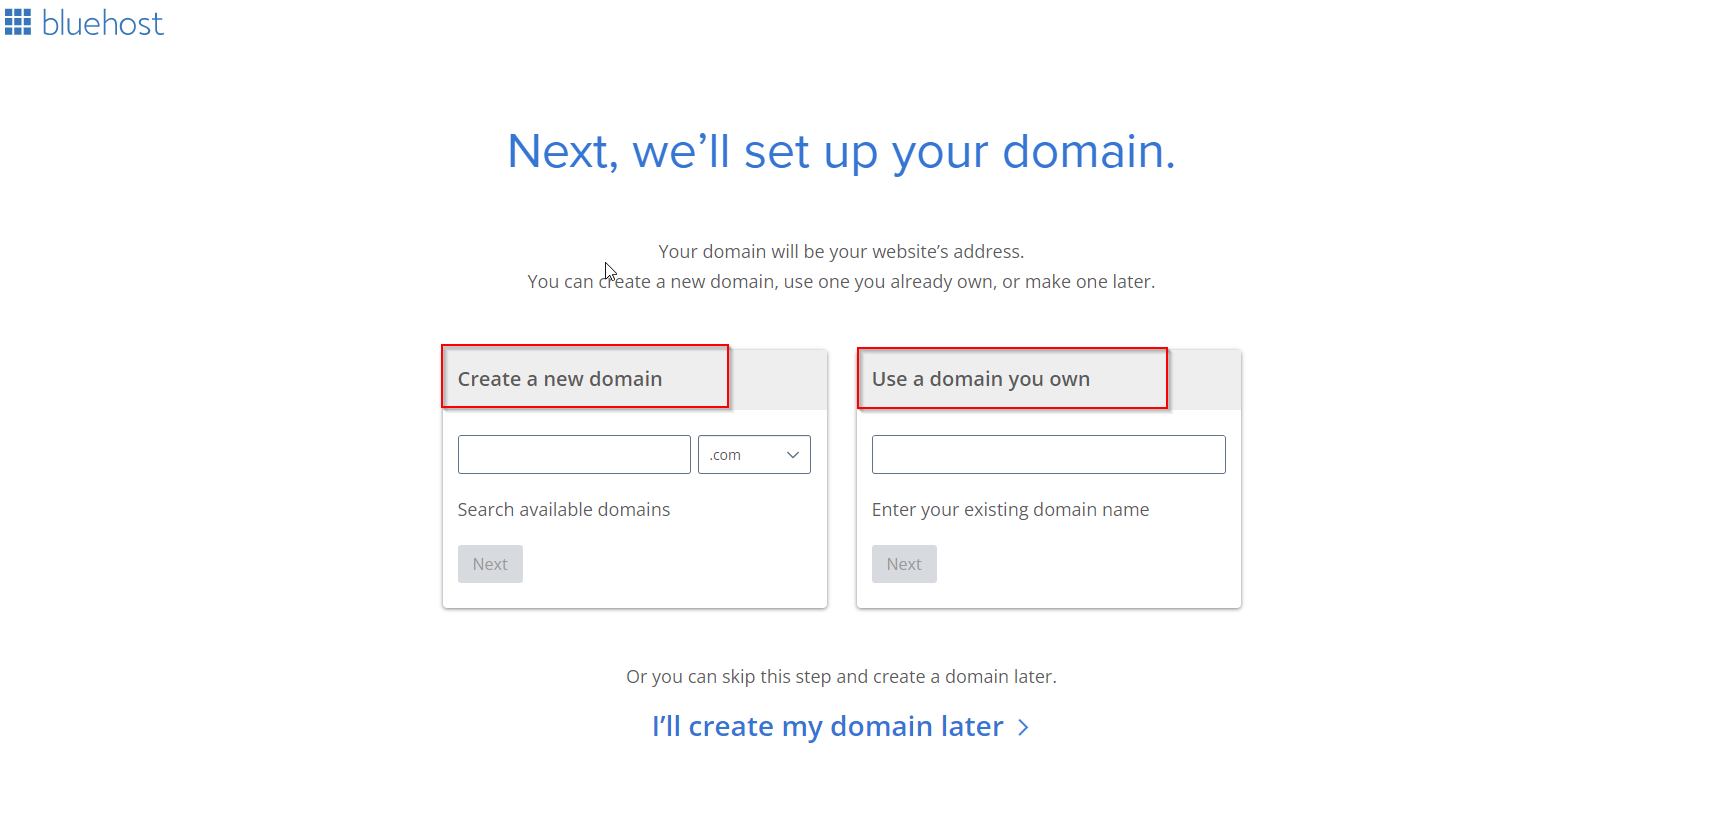 Here are some quick tips for choosing the perfect WooCommerce domain name.
- You can use keywords in your domain name, for example, if you want to sell gardening supplies.
- Use your brand name in your domain name
- Stick to .com extension
- Do not use numbers or hyphens in your domain name. This makes them hard to pronounce and spell
You can even use a domain name generator to help you choose the perfect name for your business.
Choosing the right domain name for your business is important, but don’t overthink it otherwise you won’t get anywhere.
To continue, click on the next button after choosing a domain name.
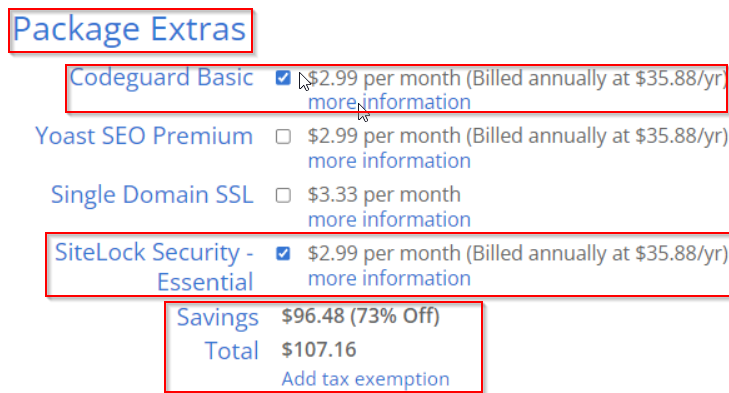
The next step is to choose a domain name and click on the next button. Under the package information section, we recommend choosing the 36 months plan because that’s the best value.
We recommend unchecking all optional extras because they will increase your costs. You can always add them later from your hosting dashboard if you need them.
In order to complete your purchase, you will need to enter your credit card information and click on the submit button.
Bluehost will send you an email with login details for your web hosting dashboard, where you can manage your website after you make the payment.
WordPress is also installed using 1-click by most hosting companies, although if you’re using another hosting company, see our step-by-step guide.
Your hosting account will automatically install WordPress for you when you sign up. Simply log in to your hosting dashboard and click the ‘Log into WordPress’ button.
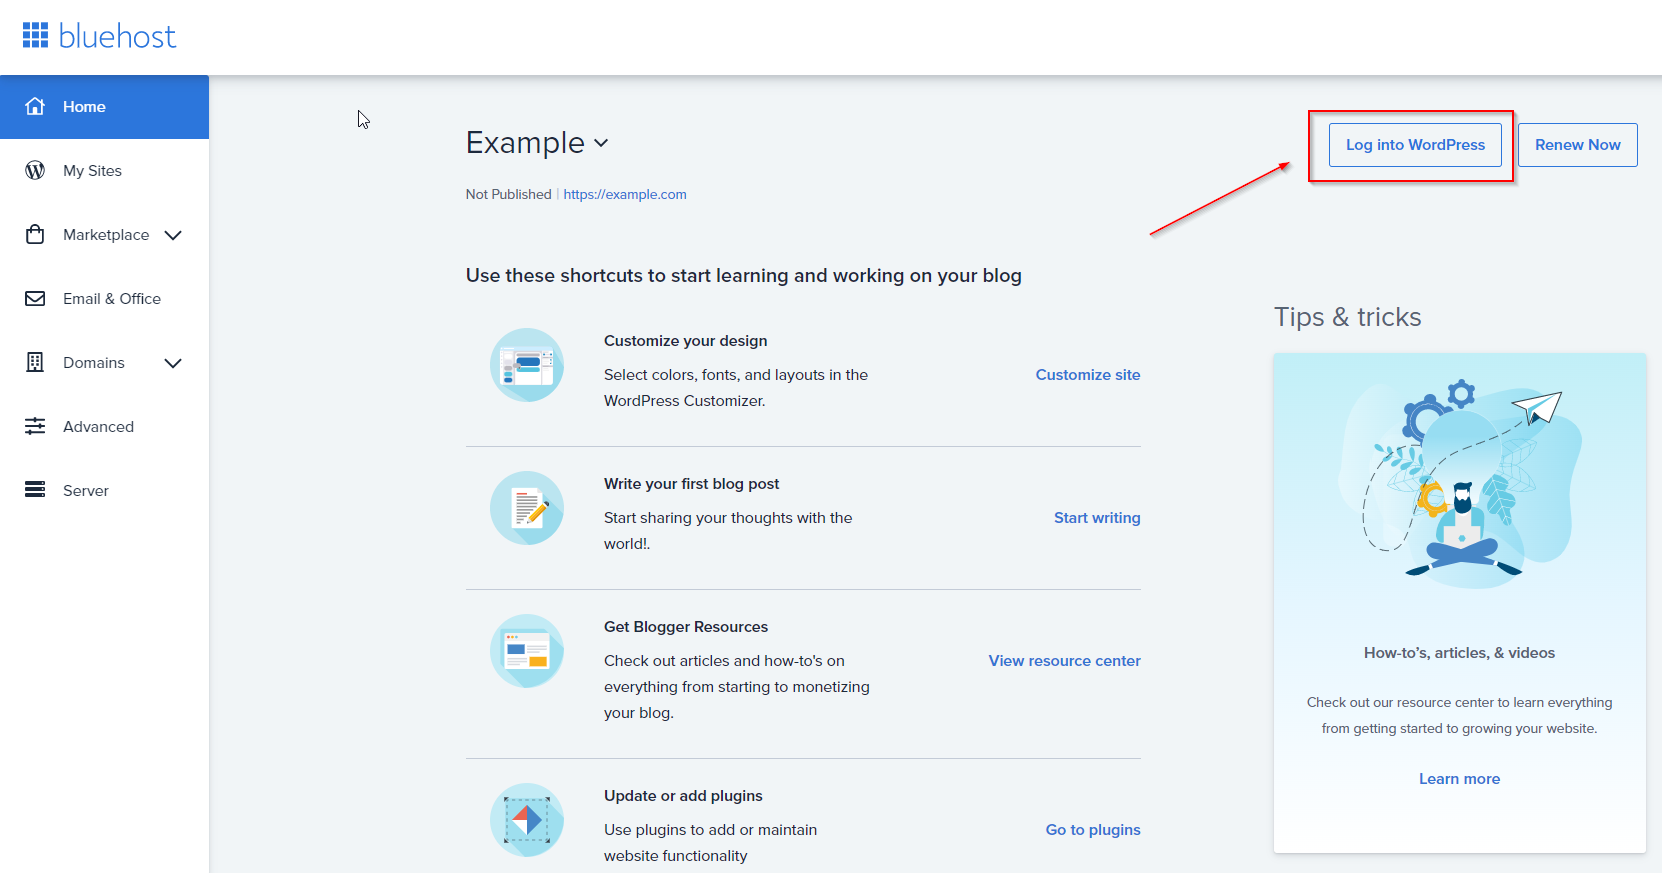
It’s always possible to log in to WooCommerce without entering a password by using this shortcut.
Now you can see the dashboard for WordPress.
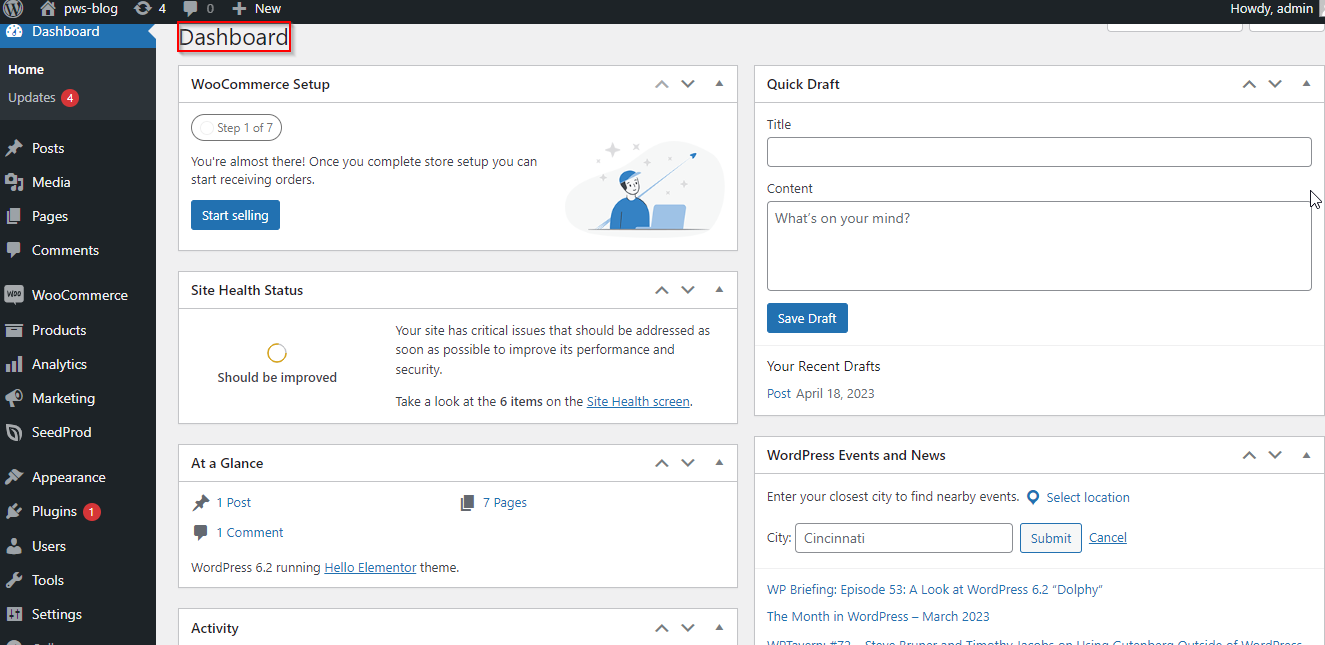
Let’s set up WordPress first before installing WooCommerce.
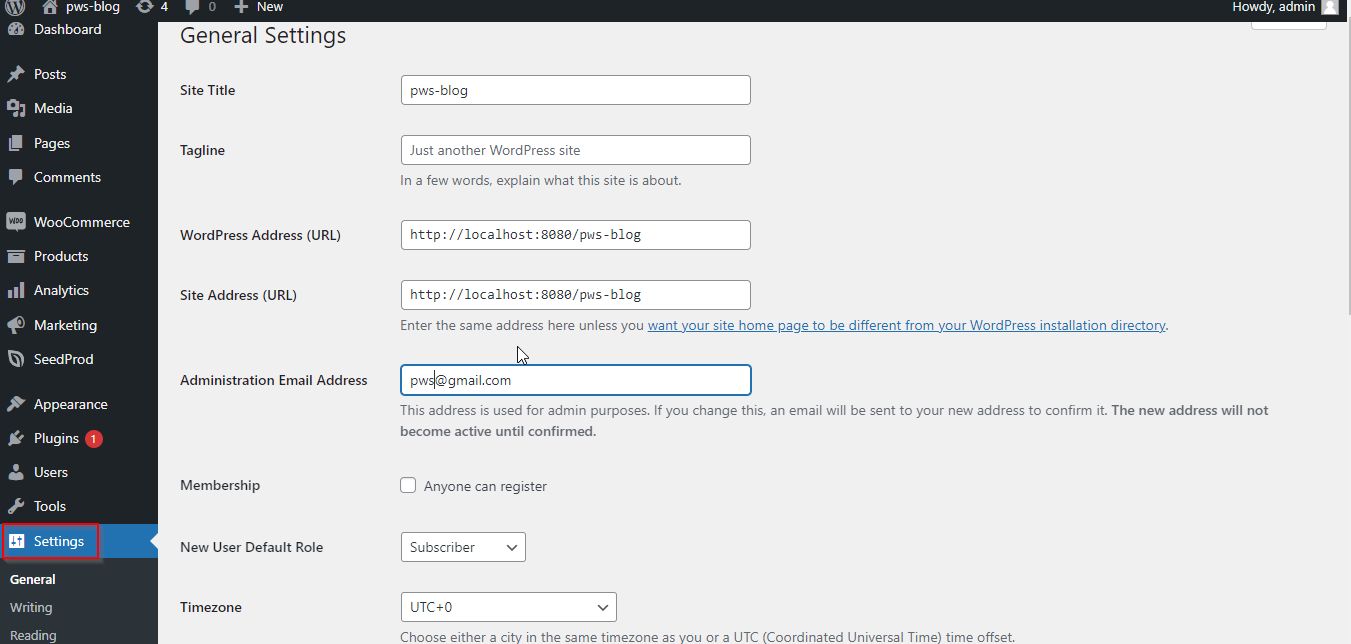
Go to the Settings page in the WordPress admin area and change your website’s title and optionally provide a tagline (description).
The SSL certificate will be installed automatically for your domain name by Bluehost. Make sure your website URL is https instead of http.
We have a tutorial on enabling free SSL in WordPress if it’s showing http.
It is important that you check the email address assigned to the website admin account. This address is where you will receive updates and password reset requests related to WooCommerce.
Select your website’s timezone settings after that.
Click the ‘Save changes’ button after reviewing all the settings once more.
You are now ready to install WooCommerce.
WordPress plugins such as WooCommerce can be installed similarly to other WordPress plugins. For an overview of how to install a WordPress plugin, see our step-by-step guide.
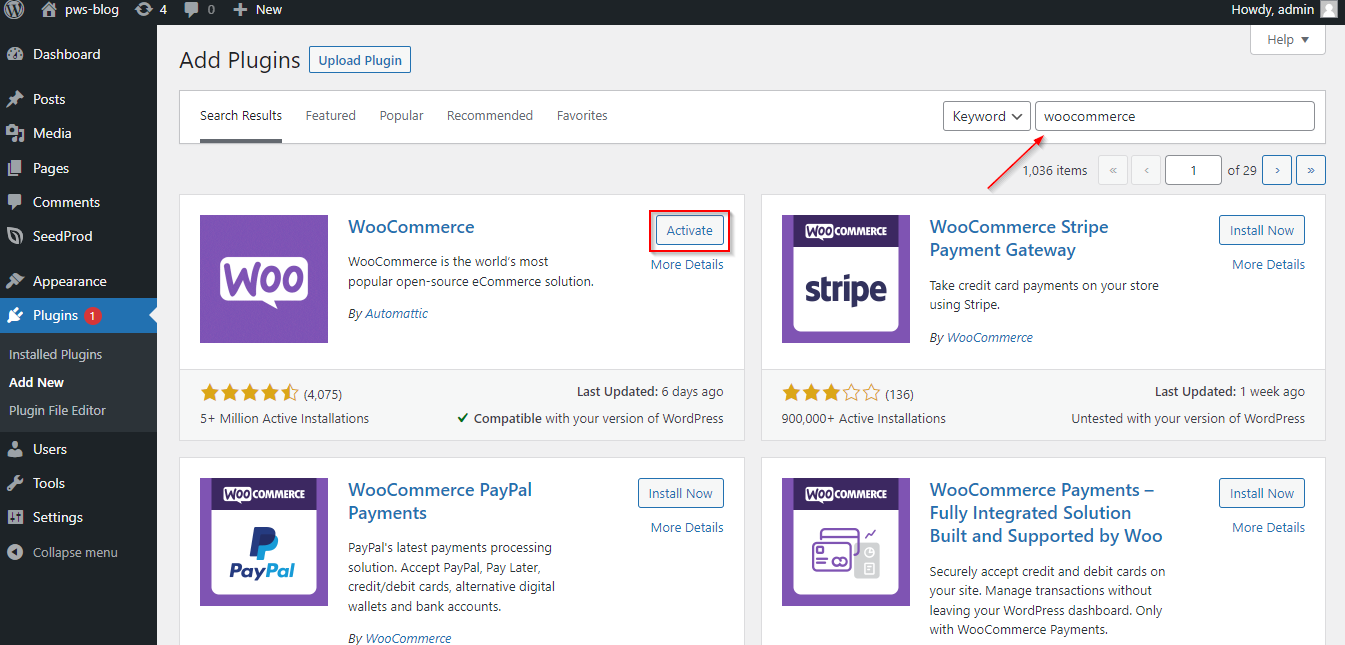
Plugins » Add New section in your WordPress admin allows you to search for the WooCommerce plugin. WordPress will now display the plugin search results. Click the ‘Install Now’ button to proceed.

The plugin files will now be downloaded and installed by WordPress.
Then, click the ‘Activate’ button to start using it.
The WooCommerce setup wizard will be launched after activation.
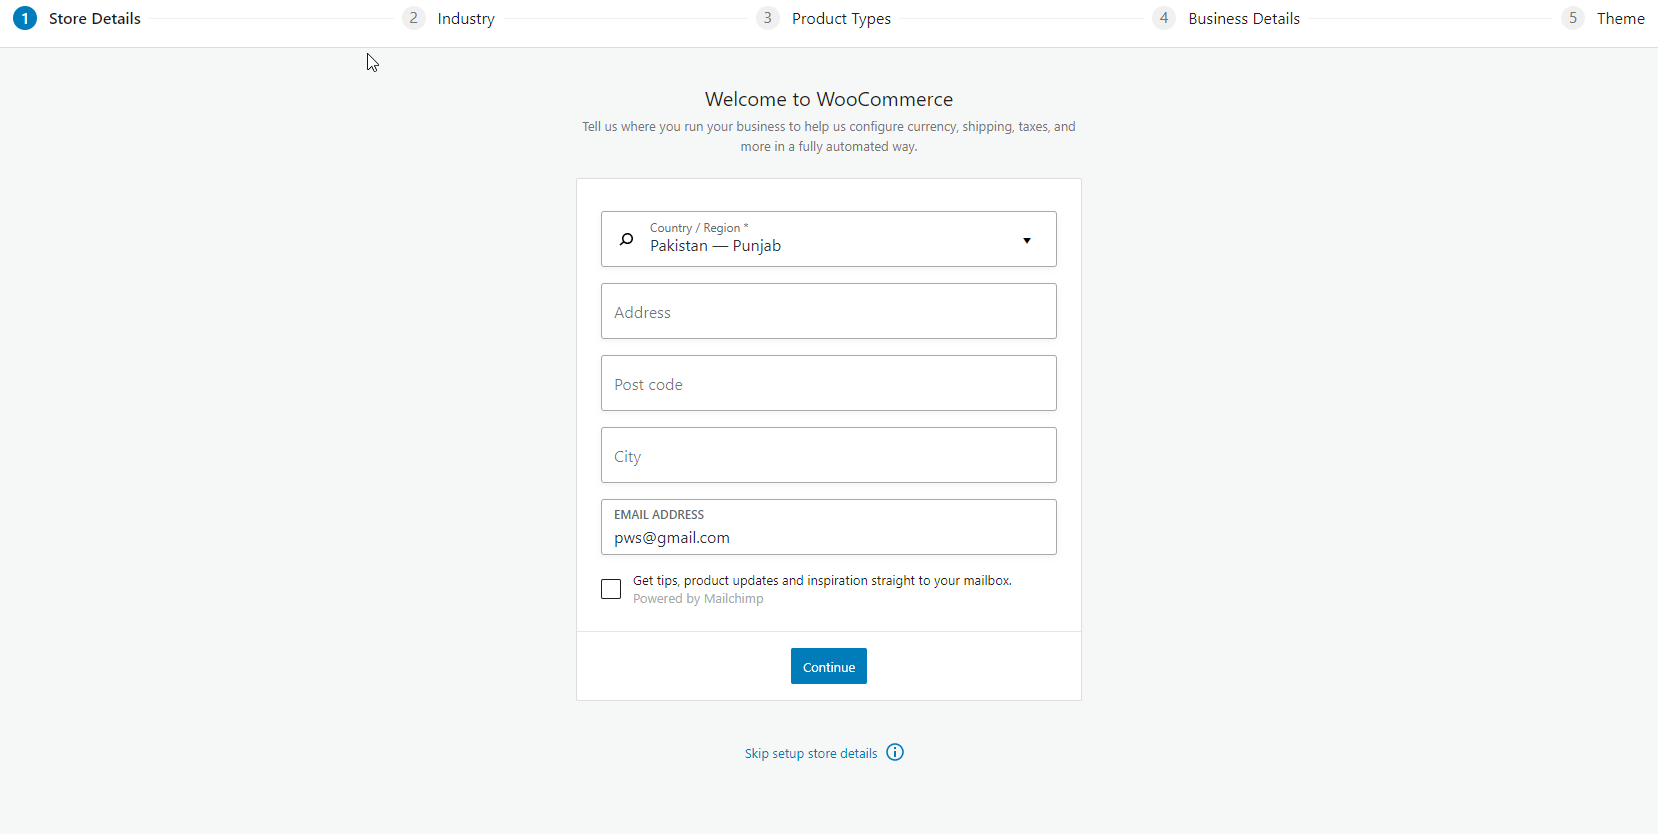
The first step is to enter your store location, then click ‘Continue’.
Choosing your industry, product type, and other business details will be the next step.
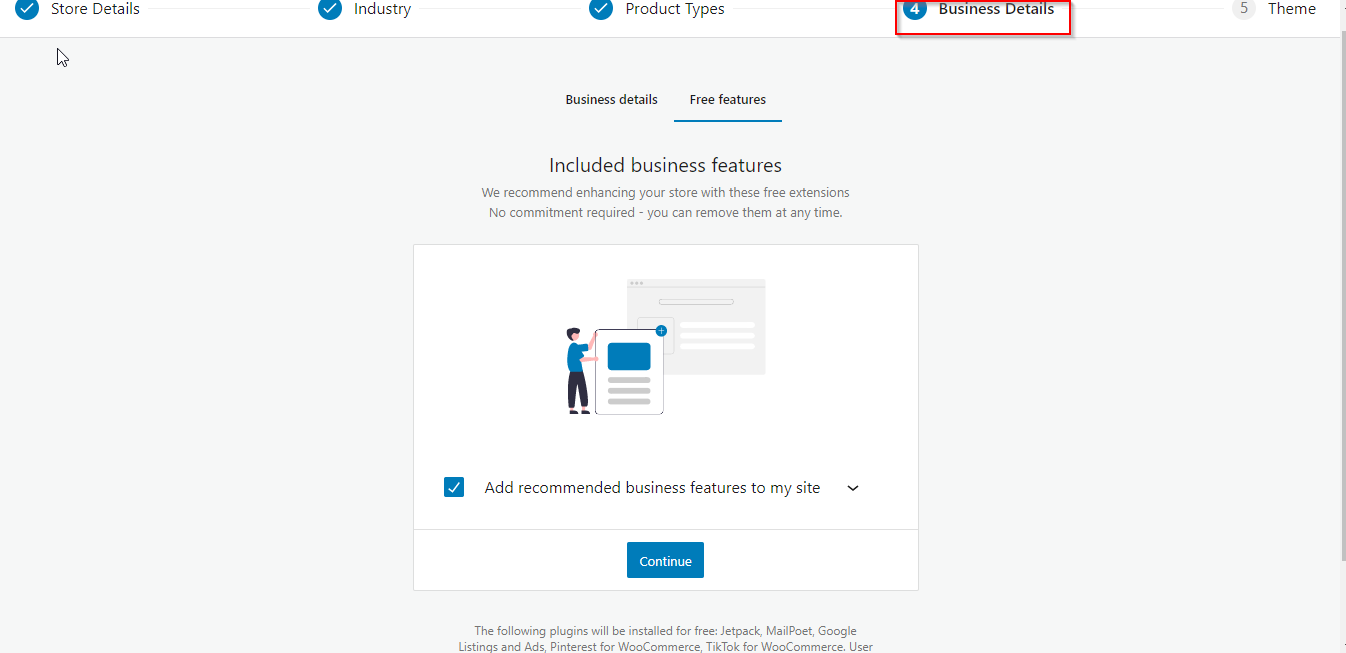
As part of the setup wizard, you will also be asked whether you want to add recommended business features to your store. These features are free, so you may choose to add them and click ‘Continue’.
A new WordPress theme can be chosen or your active theme can be continued.
For now, we recommend that you continue with your current theme and we’ll recommend the best WooCommerce themes later on.
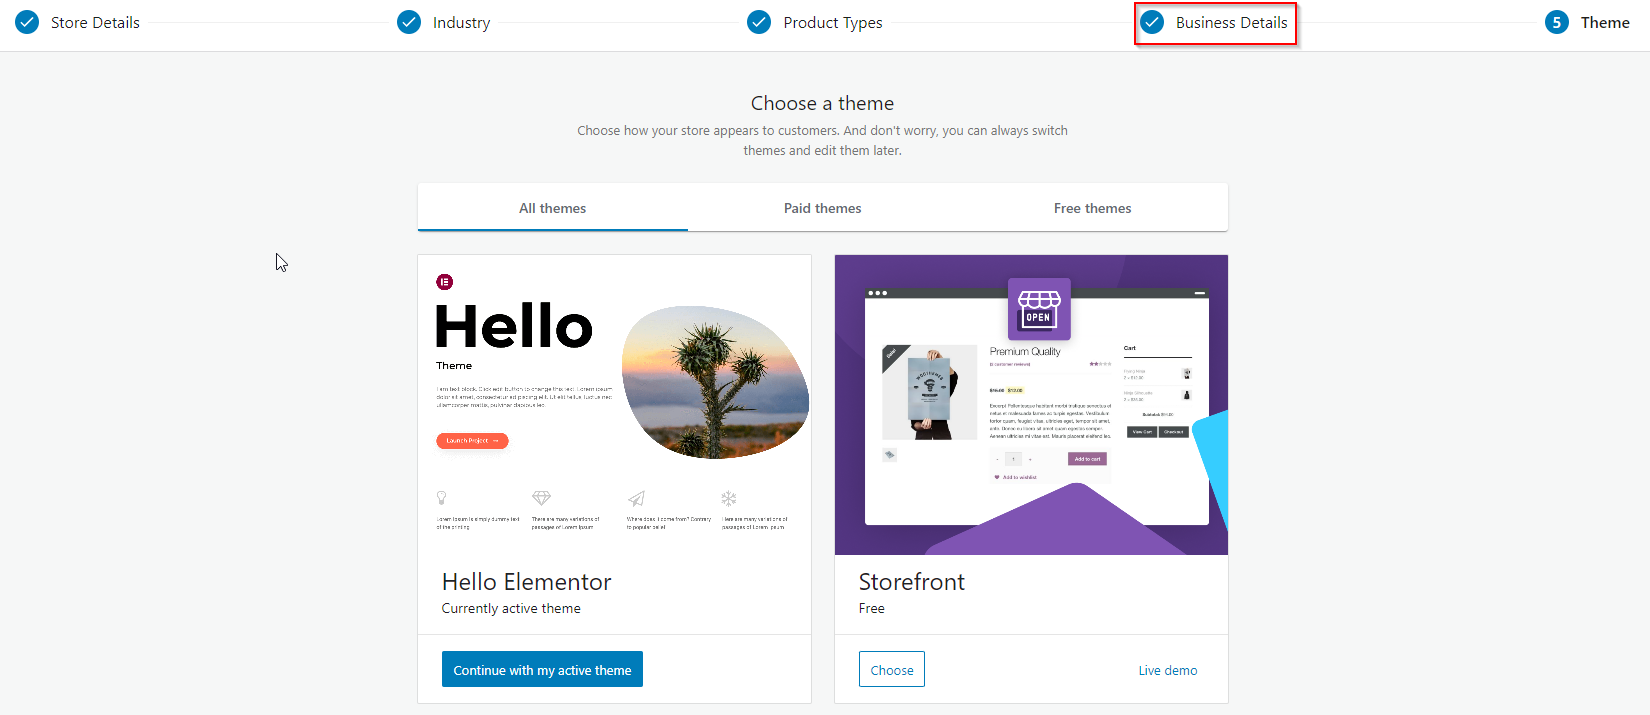
The setup wizard will save all of your WooCommerce settings once you click the ‘Continue with my active theme’ button.
Then, you’ll be redirected to your WooCommerce dashboard where you can finish setting up your store.
You can customize your WooCommerce store by following the checklist on the dashboard.
Select ‘Add my products’ from the menu.
How to add products to WooCommerce
You can add your first product to your store using a template, manually, via CSV, or from another service.
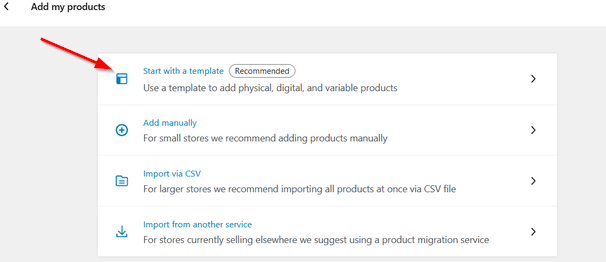
This tutorial shows you how to add a template to a product.
Select a template for a physical product, digital product, or variable product next.
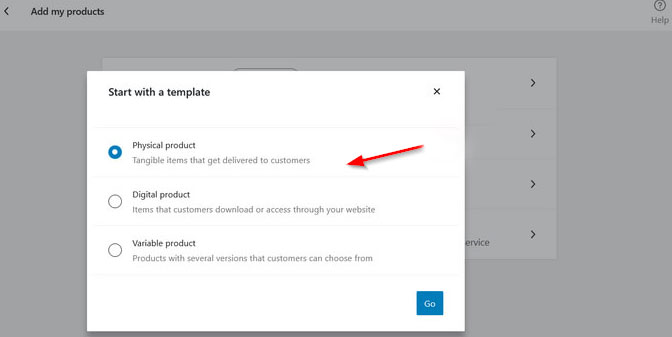
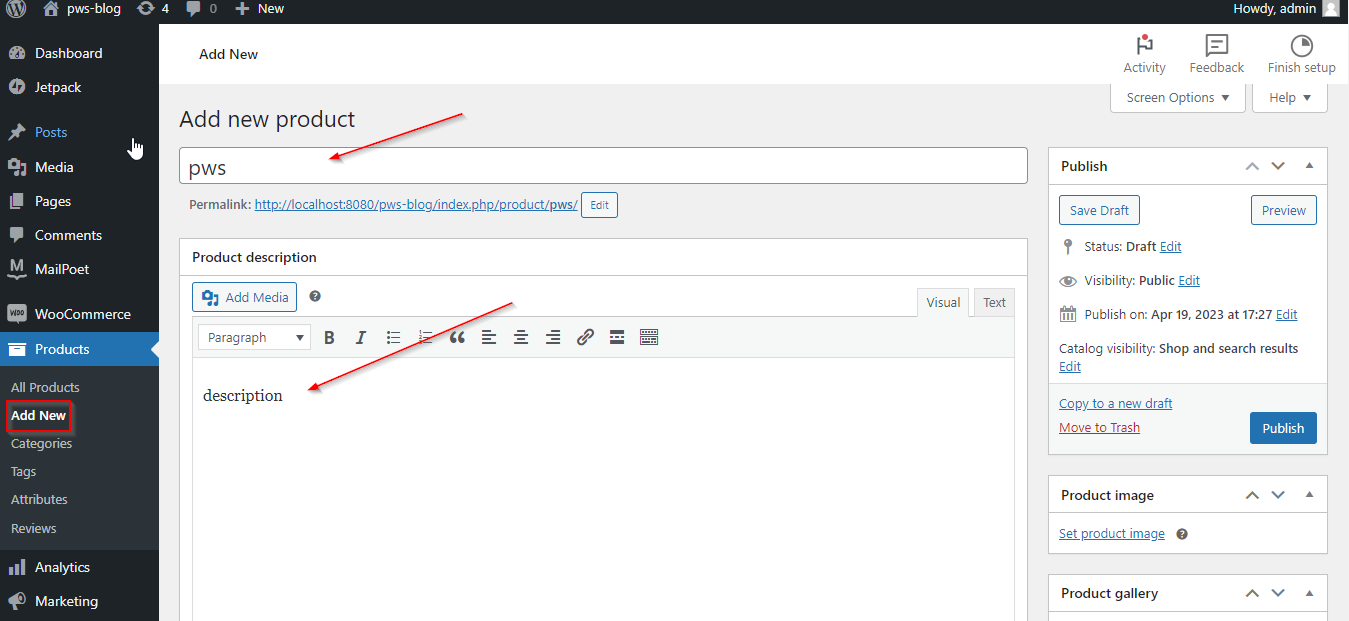
The ‘Go’ button will take you to the product editor. Alternatively, you can add new products by going to Products » Add New from the WordPress menu.
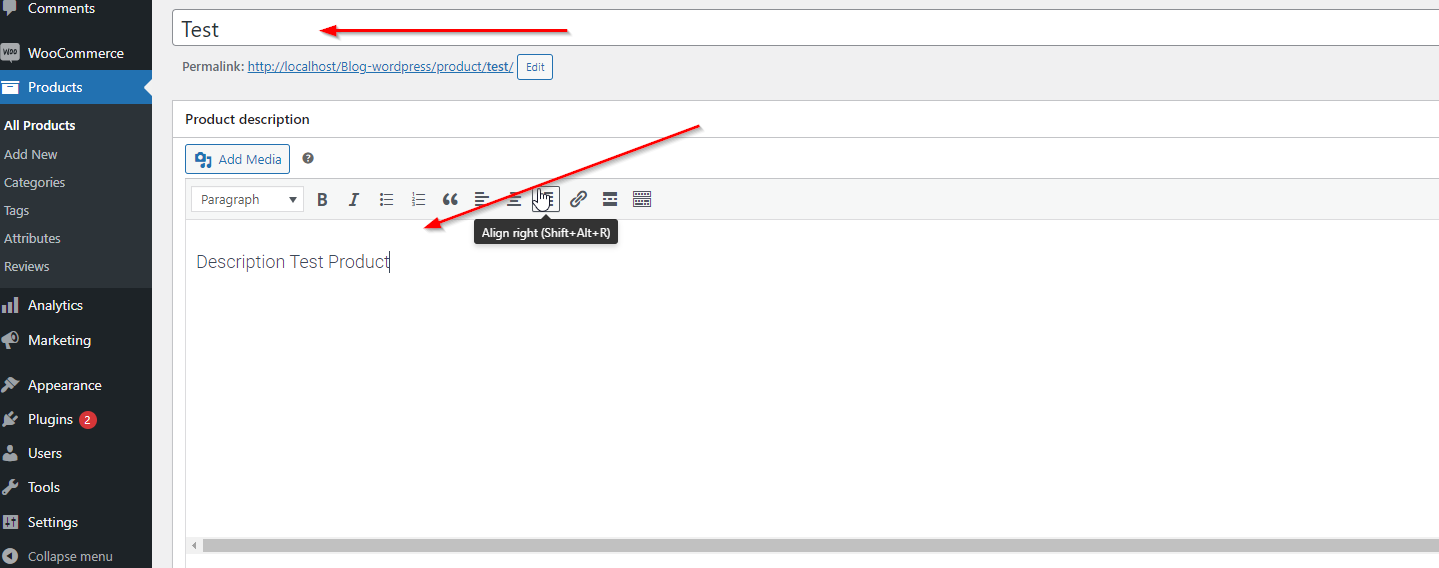
Your product must first be titled and then described in detail.
Once you have selected the product, click the ‘Add new category’ link to create a new category.
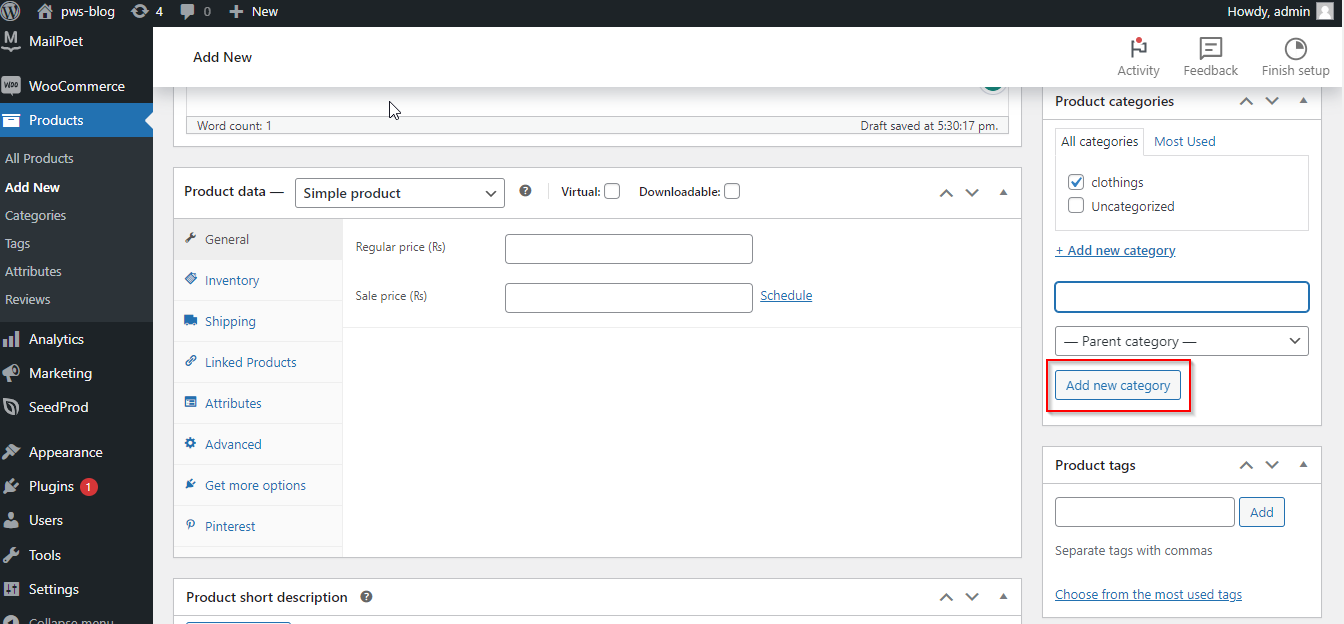
A product category allows your customers to easily browse your products.
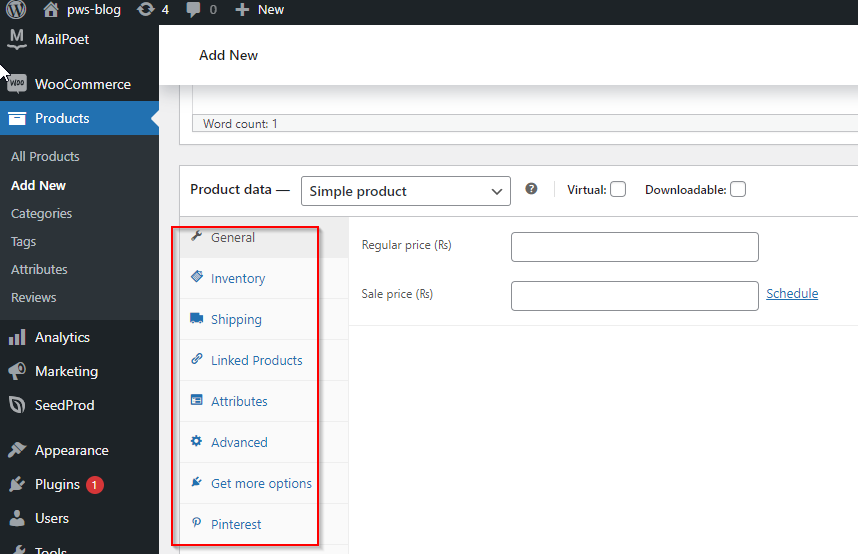
You will need to scroll down a little to the ‘Product Data’ box where you can select the product type, add product pricing, shipping costs, and group products.
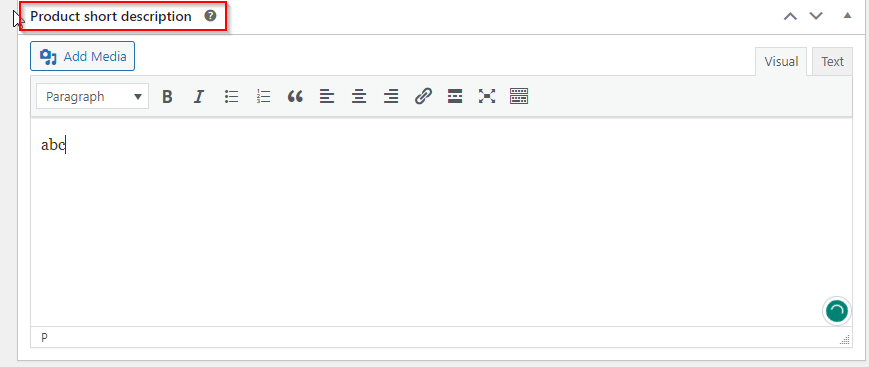
Next, you will see a short description box. This description will be used on different product pages on your website. Make the description catchy and informative in order to get more clicks.
The best way to make a product page useful is to include product images. WooCommerce makes adding product images to each product page super simple.
Your first step is to upload the main product image. This will appear on all shop pages across your store.
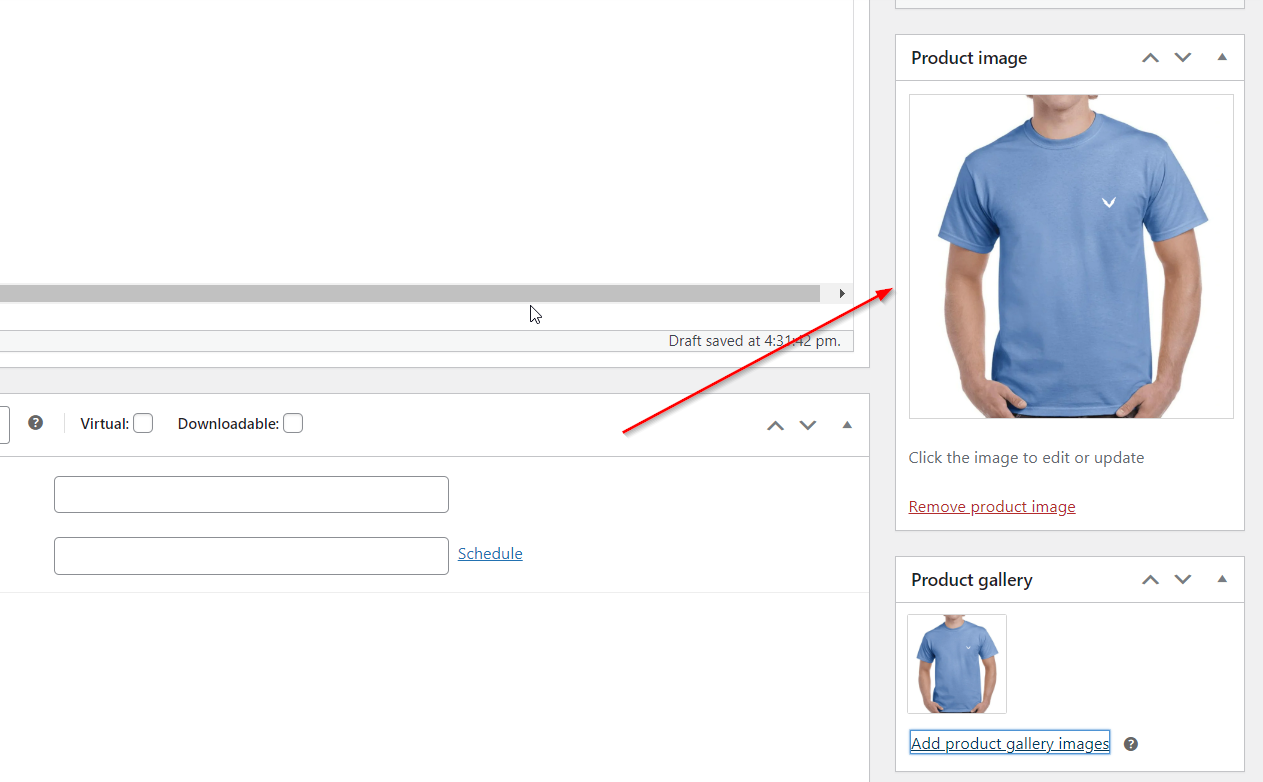
A product image gallery can be created by adding multiple images below that.
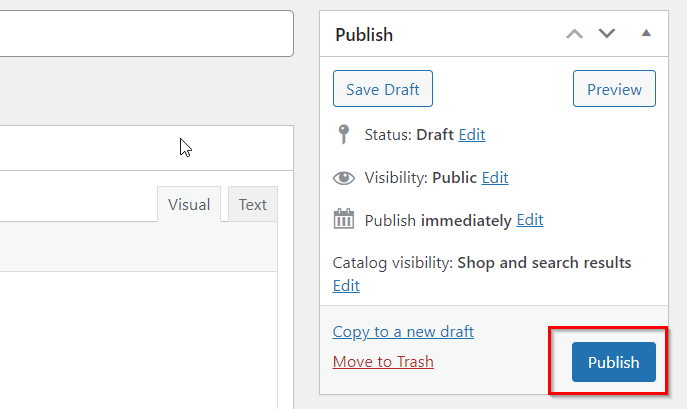
As soon as you are satisfied with all the product information that you have added, you can make this product live on your store.
Publish your product by clicking on the ‘Publish’ button at the top right of the screen.
If you wish to add more products to your website, you can repeat this procedure.
How to set up WooCommerce payments
Your next step is to add payment options so customers can purchase your products online.
Using the WooCommerce » Home page, click on the ‘Set up payments’ option to see the WooCommerce setup checklist.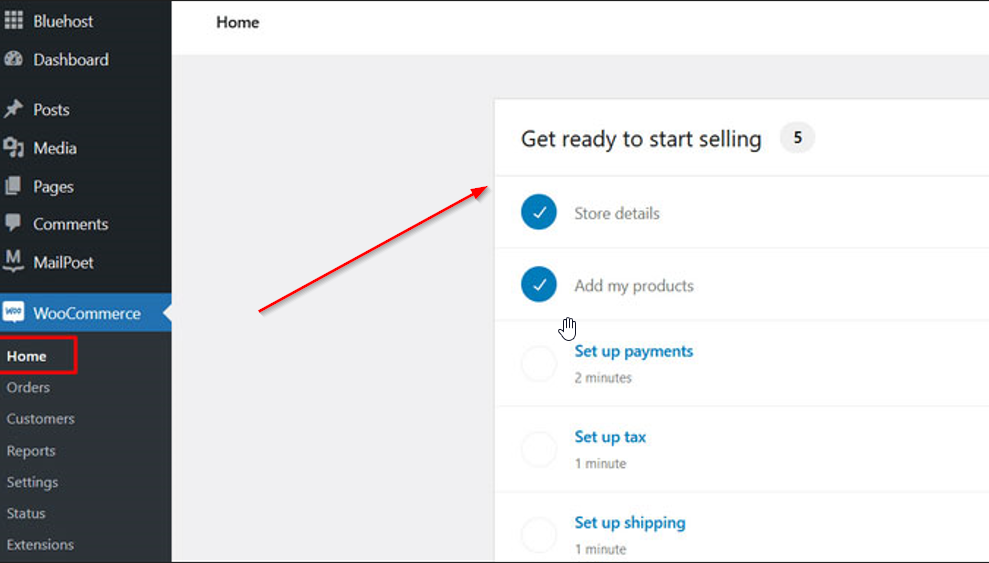
You can choose from Stripe, PayPal, Klarna, or even direct bank transfer or cash on delivery from the list of payment processors available.
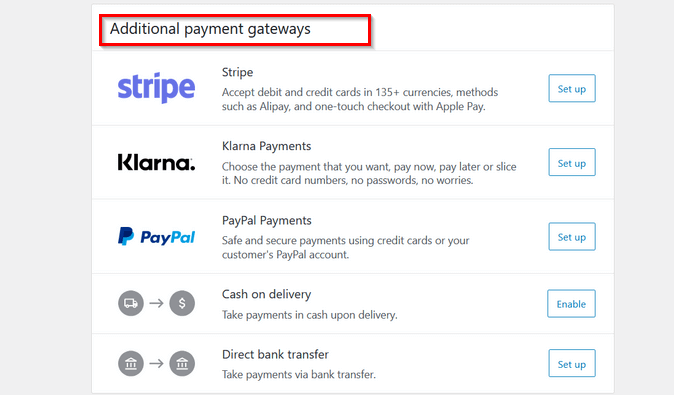
Once you’ve chosen a payment gateway, follow the instructions on the screen.
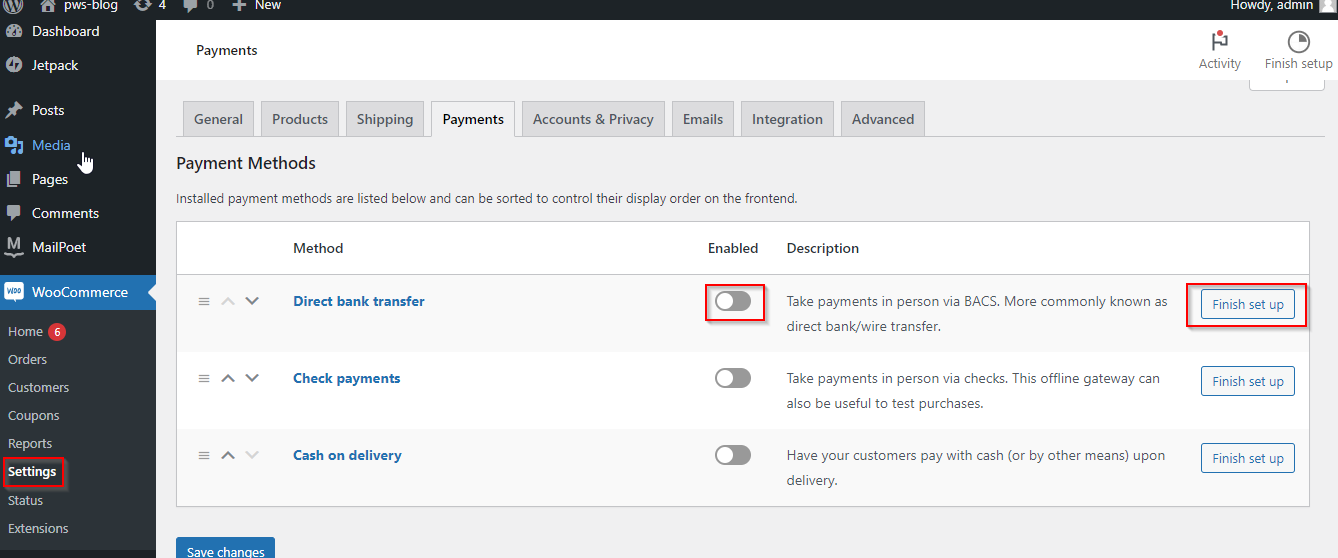
The WooCommerce » Settings » Payments tab allows you to add new payment methods in the future.
The next step is to configure your tax rates.
How to set up tax in WooCommerce
The next step in the setup guide for WooCommerce is to set up tax.
Taxes can be added with WooCommerce Tax, Avalara, or manually. If you do not wish to charge taxes, you can select the ‘I do not charge sales tax’ option.
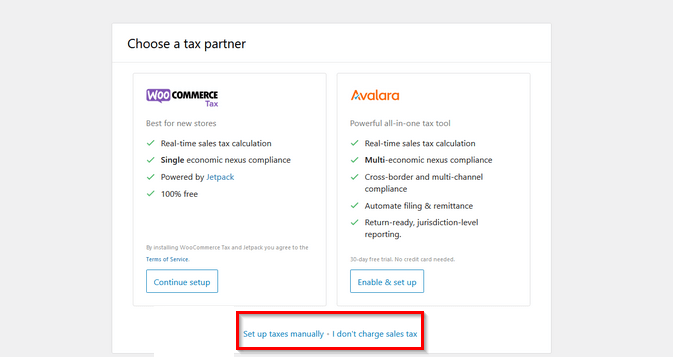
You will learn how to manually set up taxes in this tutorial.
When you choose the manual option, you will be taken to the WooCommerce » Settings » Tax page.
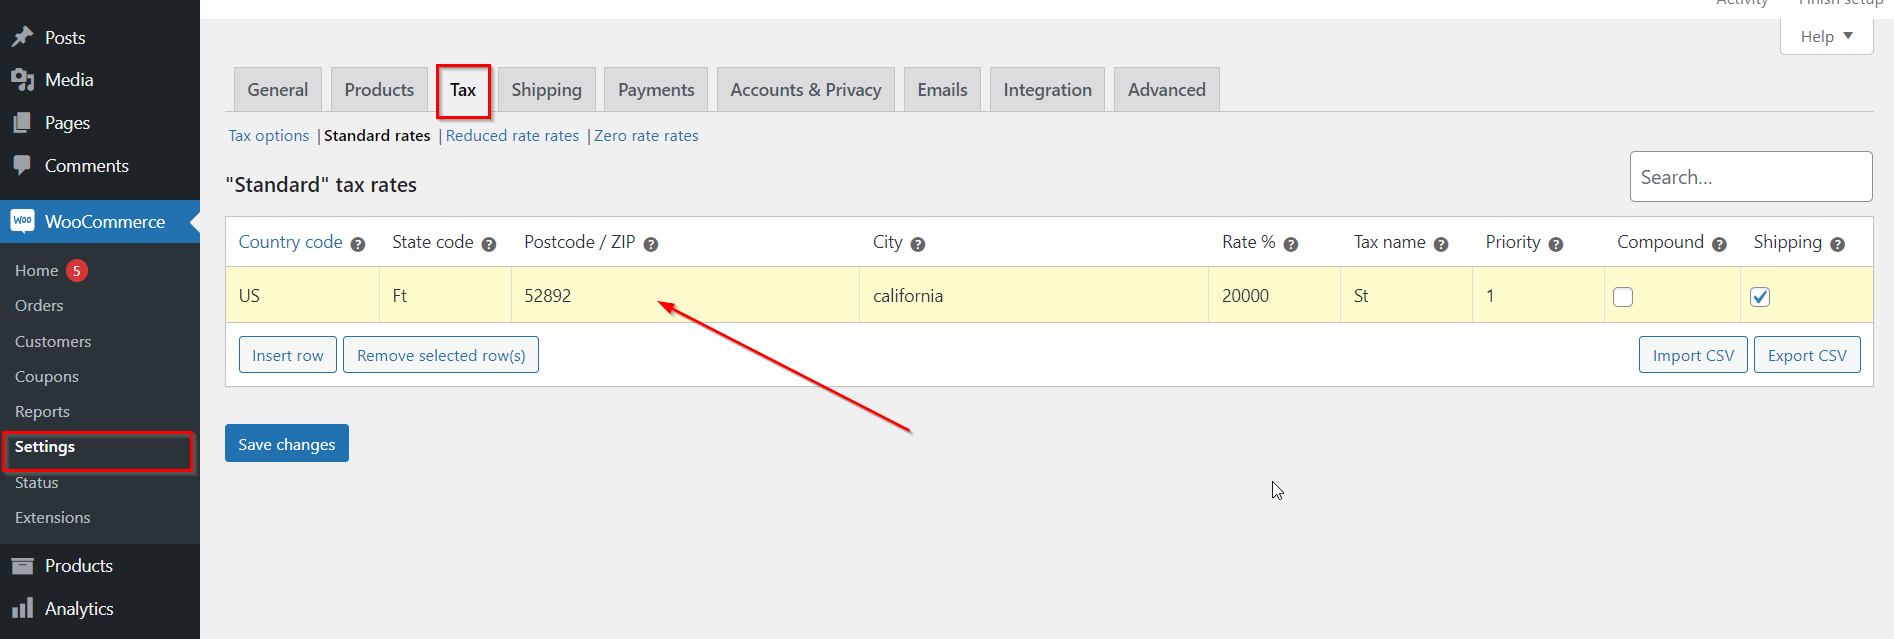
Whenever you complete your tax information, you will be asked for your country, state, city, and zip code. You will also be asked to enter your tax rate and tax name, such as sales tax or GST.
Don’t forget to click the ‘Save changes’ button to save your tax details.
Setting up Shipping in WooCommerce
Next, you can add shipping options by going back to the WooCommerce setup guide and clicking on the ‘Set up shipping’ task.
The page allows you to enter the shipping costs within your country, or you can leave the price at zero to offer free shipping. You can also set up different shipping classes to offer different rates depending on the product type.
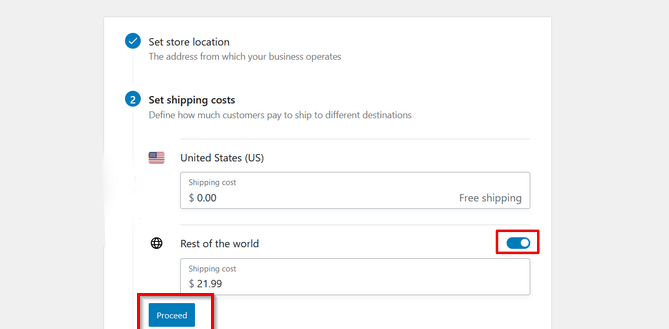
You can enter the cost for different shipping zones if you’re shipping to other countries.
Click ‘Proceed’ after entering your shipping prices.
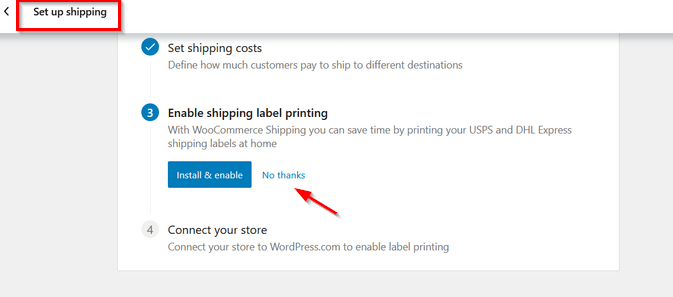
Click ‘No thanks’ if you don’t need WooCommerce Shipping to save time by printing shipping labels at home.
You’re almost finished setting up WooCommerce. Let’s see how you can customize your store further.
A professional design for your online store makes a big difference in how customers perceive your brand.
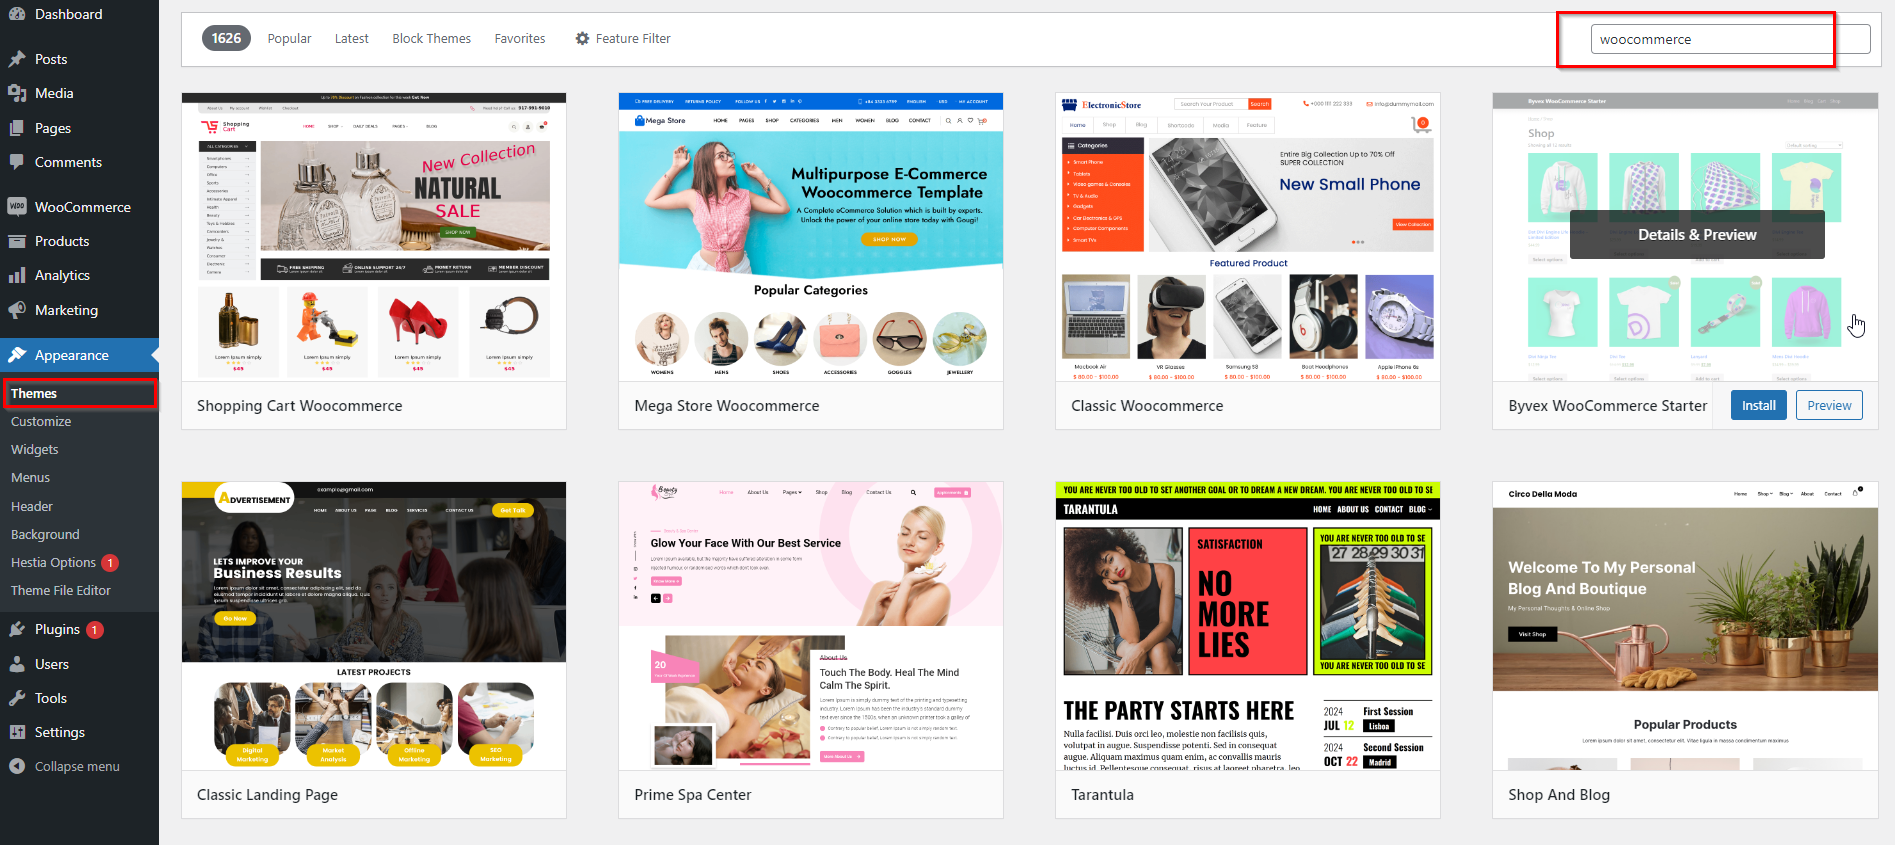
Thousands of WooCommerce templates and themes are available on the market. While you can use WooCommerce with any WordPress theme, we recommend choosing a WooCommerce-ready theme.
You’ll be able to increase sales on your website with these themes made specifically for WooCommerce websites.
Thousands of WooCommerce themes are available on the market, making it difficult for beginners to choose the best one.
You can easily use these mobile-friendly, SEO-friendly, and highly optimized WooCommerce themes.
- Astra – This is one of the top WooCommerce ready WordPress themes on the market. It has built-in templates for product and shop pages as well as dozens of 1-click ready-made websites that you can easily customize.
- Ocean WP – An easy-to-customize theme for WooCommerce.
- Shoppe – An easy-to-use and highly customizable WooCommerce theme. It also comes with its own page builder that allows you to create landing pages easily.
- Outfitter Pro – WooCommerce theme made specifically for clothing stores and brands.
If you’re looking for more options, take a look at our expert picks of the best WooCommerce themes.
WooCommerce’s real power comes from its extensions. These extensions work exactly like WordPress plugins, and they can be installed just like any other WordPress plugin.
WordPress and WooCommerce both have thousands of plugins that can be used to build contact forms, landing pages, pricing tables, gift cards, and more.
The following are our top WooCommerce plugins for any eCommerce store.
- WPForms – Easily create customer survey forms, login forms, and more with this plugin.
- MonsterInsights – Using MonsterInsights, you can track the top products, categories, and landing pages for your website.
- SeedProd – It’s the best WooCommerce page builder plugin for drag and drop. You can use it to create stunning landing pages for your products, marketing campaigns, sales events, and more. You can even use it to create a completely custom WordPress theme for your store without any coding knowledge.
- AIOSEO – All in One SEO is the best WordPress SEO plugin used by over 3 million websites and helps you rank higher with WooCommerce SEO.
- FunnelKit – You can add one-click upsells, order bumps, and other eCommerce automation to WooCommerce checkout pages by creating sales funnels and customizing WooCommerce checkout pages. A marketing automation toolkit, FunnelKit Automations, is also included so you can set up WooCommerce email automation.
- AffiliateWP – Create affiliate referral programs for WooCommerce stores easily.
- Advanced Coupons for WooCommerce – This plugin allows you to create coupons for free shipping, BOGO offers, as well as loyalty programs and gift cards.
- OptinMonster – allows you to create spin-a-wheel campaigns, floating bars, and other sales-boosting popups.
- TrustPulse – Increase sales instantly with the help of social proof and fomo
- SearchWP – enhances WooCommerce product search with live AJAX search and more.
- RafflePress – Promote your WooCommerce store with viral giveaway campaigns.
- PushEngage – Sends web push notifications after visitors leave your website.
See our expert pick of the best WooCommerce plugins for a more comprehensive list.
Note: The Jetpack plugin by Automattic may be recommended by other guides, but we do not recommend it because it can bloat your site with unnecessary features.
You are now ready to promote and grow your WooCommerce store now that it is up and running.
You can learn WooCommerce using these resources and grow your online store like a pro.
- Start an Email List
In WooCommerce, more than 90% of visitors leave without buying anything. It’s like losing money by not getting these users back.
For online store owners, building an email list is extremely important.
If you have an email list, you can stay in touch with your customers without them having to buy anything, opening a direct line of communication between you and them.
Details and step-by-step instructions can be found in our guide on how to properly set up a WooCommerce email newsletter.
Thousands of email marketing services are integrated with WooCommerce, including Constant Contact, HubSpot, SendinBlue, Drip, and many others.
- Generate More Leads
A website visitor who joins your email list is a potential lead or customer, so it’s important to offer multiple ways for them to join. This is called lead generation.
Most store owners make the mistake of only adding a basic email signup form to their store which hurts your overall conversion.
OptinMonster is the world’s best lead generation software that makes it easy to convert abandoning website visitors into email subscribers and then into paying customers.
You can learn more about converting WooCommerce visitors into customers by checking out these tips.
- Track WooCommerce Users
You can use marketing data from your e-commerce store to make informed decisions, such as which products are popular, which products are struggling, and more.
Making data-driven marketing decisions and adjusting your strategy based on these insights helps you maximize your opportunities.
A single click can unlock a treasure trove of useful data using MonsterInsights’ enhanced eCommerce tracking.
Google Analytics instructions on how to track WooCommerce customers can be found here.
- Learn WooCommerce SEO
Your WooCommerce store can benefit from SEO, or search engine optimization.
You can do so much more with WooCommerce Plugin than what it offers out of the box.
For beginners, WooCommerce SEO can be a bit intimidating and technical, which is why we have prepared a step-by-step guide that will take you through the process without requiring any expert input.
It’s best to use the AIOSEO plugin because it gives you everything you need to rank higher.
- Recover Abandoned Cart Sales
According to an average from all eCommerce websites, 60-80% of customers who add a product to their cart never complete the purchase.
It’s pretty much a waste of time and money for eCommerce site owners to ignore this metric from the beginning.
This cheat sheet will show you how to easily recover abandoned WooCommerce Plugin cart sales.
We hope you find these resources useful for improving and growing your Ecommerce store using WooCommerce Plugin.